How to Paint Wood Stairs with Chalk/Mineral Paint
Oct 03, 2018
AFFORDABLE DO IT YOURSELF HOME PROJECTS | CHALK/MINERAL PAINT DIY PROJECT | HOW TO PAINT STAIRS | DIY MAKEOVER | PAINTED STAIRS
You know those areas of your house that make you go “Blech?” The dark and dated wood staircase in my daughter’s house was like a creaky pathway of gloom up to the second floor.

Until last weekend…
While we were visiting, Kacey talked me into helping her transform the stairs. It turns out, painting stairs is pretty easy—so easy, you can let your kids help!

I agreed as long as she agreed to do the less-fun part of cleaning. She used her floor steamer and a magic eraser for the tougher grime. When painting stairs (and floors) it’s easy for dust and dirt to get in the way, so get the area as clean as possible.

These are the supplies we used (with the exception of a foam roller—we thought we’d use it, but we ended up using the stippling method):

- BB Frösch Paint Transformer
-
Two paint colors—Benjamin Moore “Hale Navy” and Behr “Polar Bear” (we had leftover paint from this bathroom floor project.)
-
Four different stencils from Michaels
-
Blue Painter’s Tape
Once the steps were clean, we taped off the front edge and back edge of each tread (as usual, the girls played as close as they possibly could to our project the entire time):

We mixed BB Frösch Paint Transformer into our two colors of paint. Click here for detailed paint mixing directions.

Using a large specialty paint brush, we painted two coats of white paint onto the front of each step using cross-hatch strokes. Cross-hatch strokes help chalk/mineral paint self-level, giving a smoother end result. This is the first coat (pretty spectacular coverage for white!)

Once the second coat was dry, we measured off and taped the middle of each step. The middle was at 18 inches. Since stencils rarely fit your project perfectly, and these stairs were no exception, it’s important to place the stencil in the middle and work your way out. Any pattern should be centered this way. If there is a partial pattern, it will end up being evenly placed at both ends of the step.

With the stencil centered and taped on the step, we loaded a small specialty paint brush with navy paint. Then, we dabbed the brush onto a paper towel to remove most of the paint before using a stippling motion to apply the paint over the stencil.

Removing most of the paint helps ensure you won’t have wet paint bleeding under the stencil. Using a stippling motion, instead of brushing back and forth, also helps keep the pattern crisp and the paint from getting under the stencil.
Once the first pattern is applied, move the stencil over and place a portion of the stencil over the painted part to line the pattern up. Take note that the stencil is centered top-to-bottom.

We used four different patterns on eight steps so that each pattern was only used twice. I love that Blaire likes to participate. Before I discovered chalk/mineral paint, I probably never would have let my littles help with projects like this. But now, not only is the paint safe for their tender skin, it’s pretty much fool-proof!

Paint will inevitably get on the back of your stencil, either from placing the stencil over wet paint or from a little bleed. Just use a baby wipe to wipe off the back of the stencil every once in awhile.

Once all the steps were stenciled, we applied the same floor sealer that we used on the painted linoleum floor project a couple months back. It has held up amazingly in the bathroom, and we wanted the painted stairs to hold up to being kicked by dirty shoes.

This sealer can be applied either with a cloth roller or a foam brush. We found the foam brush worked best on the steps. We let the first coat of sealer dry overnight, then applied the second and third coats the following day.

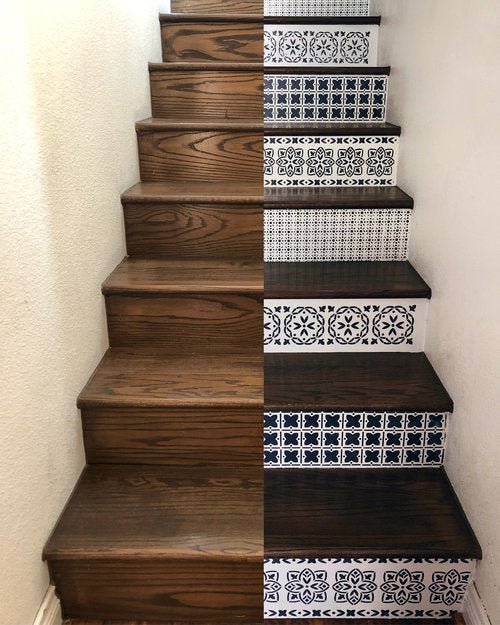
It is incredible how much this transformation brightened the stairway!

We got pretty lucky with the way the patterns worked together. I would advise thinking about which patterns will have more white and which will have more of the darker color, then alternating them.

The stairs still creak when we walk up them, but I don’t mind at all, now that they’re a lot prettier to look at.

It’s possible I say this about every paint transformation we do, but this one might be my favorite.